|
January 2005, and somehow or other I found myself making a Lee Valley Veritas wooden spokeshave kit...
|

|
Heres the kit all laid out, along with the two blanks I prepared. Two, because I didnt doubt my ability to screw up at least one of them. I chose apple wood for a variety of reasons; its a traditional timber used in tools, its air dried which is nicer to use with hand tools, this particular piece came from a source here in Cornwall that ceased to trade last year and I thought itd be nice to have a memento preserved in a (hopefully) working tool, and most importantly, there was enough for a spare blank |

|
I followed the instructions to the letter (one of those things I'm no good at) and squared a line right round the middle of the length of the blank and then drew round the templates provided on the top and bottom. I made a copy of the template and glued it to some card; the former in case I mucked up the original, and the latter cos I had a feeling I might be doing this step more than once
Also as instructed, I carefully marked the top, bottom, front and back. |

|
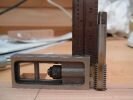
The next step was to mark the location of the blade holes. Rather than measure the given 1 13/16 from each side of the centre line, the instructions called for using the blade itself to mark the second. So first up I had to screw in the posts; a 6mm spanner fitted just right. The blue tape is a visual reminder to avoid the sharp edge of the blade. |

|
Then one post is located in the marked hole, and the other post tapped to mark the second one. Id expect that to be necessary for a hand forged blade where the width is likely to differ from blade to blade, but I was interested to find it recommended for a machined product like this. It worked, so no worries, and theres a lot to be said for marking from the workpiece rather than using measurements. |

|
And of course I managed to mark the top first time round, but it needs to be on the bottom as thats the side you drill from. Doh. |

|
Now the vital bit; boring the holes for the adjustment thumb wheels. The instructions called for the blank to be firmly clamped, not moved between changing drill bits and so forth. I ignored them. I trashed the first blank. I stopped ignoring the instructions and made a simple clamping jig from a piece of ply, a scrap fence and a couple of toggle clamps. It all worked perfectly. Firstly a 3/8 forstner bit set to bore a hole just a fraction deeper than the blade is thick. Eventually thatll form the ends of the blade recess. |

|
Then, without moving the blank, I switched to a brad point bit to make the hole all the way through the body for the thumb wheels. The instructions called for a 5/16, which I dont have in a brad point, so a test or two was called for and I found an 8mm brad point did the job fine. The 5/16 size in a jobber bit was a disaster, and contributed to ruining the first blank |

|
And it should look like this. If it doesnt and the blade posts wont fit in properly youre stuffed. No option but to get another blank, just like I had to. |

|
Then the blank needs to be flipped over and the exit holes on the top lightly chamfered with a countersink to allow easy exit for the tap later. The instructions call for an 82° countersink but, after checking first, a 90° is fine, which seems to be the type generally available over here. Subsequently I fell over 82° countersinks in quick chuck systems designed for cordless drills, but only the day after Id finished with the countersink on this shave. Its not vital for this step anyway, but later it might have made a difference. Maybe. |

|
Now tapping threads. The correct tap is provided in the kit of course, which is great, but youll need to provide your own means of turning it. I have a tap wrench, but you could use a brace, chuck it in the drill press or whatever. You thread the holes from the bottom up, which gives you a fighting chance of having decent, straight threads near the top where they have to do the most work. If youre out of practice, do yourself a favour and practice on some scrap from the wood youre using first. You do not want to mess it up. |
|
The instructions suggest removing the tap handle frequently to test for square, and I found that pretty helpful. I dont know if its standard tapping practice and no-ones ever told me, but I took the tap right through the blank and let it drop out at the other side, rather than backing it out, and it seemed to give a better result. Like I say, maybe everyone knows that, but in case theres someone out there like me who didnt, fwiw. |

|
Et voilà! The slipper fits, Cinderella. Starting to look a bit purposeful now. |
Next part Home
|