|
|
|
This one was forced upon me by a combination of desperate need and a sudden requirement to be using a jointer plane. Rather than do a load of planing to no purpose, I thought I'd turn the minimum amount of wood into the maximum amount of storage. At one stage it looked like I'd get it done within a week, but lethargy intervened and good resolutions turned into plugged screws and a plywood back. Anyway, about 4' tall overall and about wide. Yep, no plan again, so just pot luck as to what it came out at. Materials were a rather sappy board of walnut, some leftover ash from the coffee table and a tool cabinet I made yonks ago, and cherry cut off the 2" boards that eventually became the legs for the side tables.
|

|
After a good deal of planing up of stock with the jointer (which I wasn't sure I'd be allowed to show, so no pics. Sorry) I ploughed a load of grooves in the walnut stiles and rails for the side panels. |

|
In the spirit of encouraging the use of Boat Anchors, another shot. Notice I wasn't pussy-footing about with thin shavings. This was a quick and dirty job and I wanted to make those grooves at speed, not make them look nice. After all, you won't see them anyway.
|

|
Then out with the mortise chisel, or "pigsticker", and bash out the mortises. Took me a couple to get in practice, then I was in the swing and got them done quicker than I expected. With them all clamped together like that and the groove to guide me, there was no chance of blowing out a side or making them anything but straight. |

|
I decided to give the trenching facility on the Bosch SCMS a whirl to cut the tenon shoulders, and the bandsaw for the cheeks. A little tweaking with a chisel to clean up the odd sticking point, and you can see the general idea for the side panels. I fouled up the cutting of the cherry and cut the wrong piece in half for the smaller panels. But it worked out okay as I was trying to get one "good" side, so I could get the figure to flow across that side which otherwise I'd have been unable to. |

|
The completed sides fitted but waiting finishing before the glue up. |

|
I just put a couple of coats of shellac on before gluing up. This is just for me so I'm not spending days over the finishing. As long as it stays reasonably clean and brings out the colour a bit, that's fine. I could call it a "Krenovian finish" I suppose, but that seems a bit pushy... |

|
While that was drying, I planed up the ash for some shelves and lipped the front edge with the last of the walnut. Having limited quantities of materials don't 'arf make you concentrate, I'll say that. |

|
Then I cut them to length and juggled them about to get the shelf spacing I wanted while also taking advantage of the middle rail for at least one shelf. Planning ahead here might have helped, but then I was hampered by what length of cherry I had available anyway, so maybe not... A balancing act on the bench and the miracle of photography makes it "stand up" to give me an idea of how it'll look. |

|
Then the whole thing sat in the workshop untouched for too long. The impetus was lost and I just wanted to see the back of it. So instead of anything fancy I screwed and plugged the shelves in place. I know, I know; I'm not proud. |

|
For some reason using plugged screws always makes me feel guilty, but I absolutely love paring the plugs flush. Don't ask me why, I don't know.. |

|
I decided to leave the "ears" on top and bottom; the latter as legs, the former 'cos I thought it looked better. Not so sure now... Anyway, the groove in the top ones needed to be filled in, so I planed up a suitable fillet, glued it in and pared it back. I won't claim you can't see the join, but at least it won't annoy me as much as the groove would have. |

|
A handy bit of 4mm ply tacked on the back (with brass pins! I may be scraping the barrel but I do have standards) and it's all done... |
|
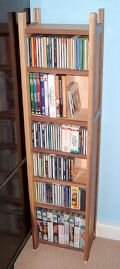
... and already in use. Hmm, there doesn't seem to be as much spare space for expansion as I'd hoped. Oh well, there's always the top... Oh, and someone's bound to notice; the shims at the front are because the floor isn't level. Okay? |
Projects Menu
|