|
Moulding Plane Rehabilitation
I wouldn't like to say how many wooden moulding, or molding, planes I've accumulated over the years. Too many. And far too many are still in need of work before they're usable, but at least this is one less. I make no claims that this the best, quickest or only way, 'cos it's not, but it is one way.
|

|
Here's it is in its as-bought state. Dirty, but the sole was straight and reasonably crisp in the important areas, the iron with plenty of meat left in it and a well-known maker... |

|
...as you might be able to make out D(avid) Malloch, Perth, Scotland (1850-1932>). It's a sash moulder, used in making sash window glazing bars; they came in pairs and this is #1. No-one seems to be entirely sure why, but the standard explanation is that plane #1 was used to do the majority of the work with a roughish cut, then #2 with a fine setting would take the last pass or two for a fine finish. The moulding is a pretty standard Ovolo. |

|
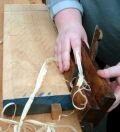
A couple of smart hammer blows on the heel of the plane and the wedge and iron came free. Hmm, pretty standard fare; these wooden moulders do tend to get pretty crusty irons. No matter; into the citric acid bath with it and we'll see what happens. |

|
Now I don't profess to have the right solution to cleaning wooden tools, but it works for me. I might hesitate if it was something valuable, which I always check first, but as it is... I took copious quantities of a Black Bison neutral paste wax and a fine grade of non-woven abrasive pad, and working with the grain, cleaned the body of the plane. It seems to adequately remove the crud while still retaining its well-earned aged look. Here I've done the rear half while the front is yet uncleaned. |

|
The gungy-looking wax is clearly visible in the mortise here; a good deal of wiping away with paper towels is needed to really get the plane clean. Avoid getting wax into the plane mortise or too much onto the wedge or the plane won't keep its setting. |

|
The finished result may not be perfect, but at least it's a lot more pleasant to the touch and it doesn't look like something from a belt sander testing workshop. |

|
Meanwhile the iron has spent a couple of hours in quite a concentrated solution of citric acid; a quick scrub under running water and it's good enough. Certainly better than I have often achieved with abrasives and elbow grease in the past. A hefty dose of wax is required to stop it rusting afresh right before your eyes. |

|
As is often the case with old moulding planes, the profile of the iron isn't quite the same as that of the sole. Sometimes it's due to shrinkage of the wood, but often it's just poor sharpening by the previous custodian. I've seen an old tip for using thin zinc sheet bent to the profile of the sole to protect it while running a slip stone along to define the proper profile, but in these modern times it's much easier to use some adhesive tape. |

|
You can just make out where the slip stone has abraded the deepest points of the profile; the shape may be right now, but the bevel angle is all wrong with no clearance, and the edge is far from sharp... |

|
... so I clamp the iron, bevel up, in a small vice and use a coarse oil slip stone to form a bevel and remove those flat areas. Use any method you like though, if it works for you. In my case it's important not to leave the iron sticking out like that while I do something else; stabbing yourself in the stomach with a plane iron is a hard one to explain in an ambulance! Where there is considerable material to be removed, there's a lot to be said for a Dremel and a small grinding cone, but you do need to be careful to avoid making things even worse... Having got the bevel to my satisfaction, I then honed it to final sharpness using a fine slip stone. Various grades of abrasive wrapped round suitable-sized dowels work just as well; some people prefer them as the longer length assists in eyeballing the right angle. But as I do have the slip stones and I didn't have a suitable dowel, the choice was simple. |
|
The iron was then set in the plane and the wedge tapped firm. I like to sight along the sole and set the blade projection by eye slightly shy of the required depth, push home the wedge, and then the final wedge-setting tap of the hammer tends to bed the iron down a fraction further to achieve the desired cut. Like many moulding planes, this one is sprung; that is the plane is held at an angle to the work rather than cutting straight down. It keeps the centre line of the plane at more or less right angles to the main face of the moulding and makes it easier to stop the plane walking off the work and also reduces the area of moulding that gets scraped to shape, rather than cut. |

|
This plane has depth stop and side fence built in to the profile, so it's simply a matter of planing with the side pressed against the work until the stop prevents it cutting any further. A little perspiration later, and the finished moulding. For a proper glazing bar you'd use a board the desired thickness and plane the moulding again on the reverse to form the glazing bar profile. Then a sash fillister would form the rebate to take the glass. As it is, it makes quite a nice decorative moulding for quite other uses. Only, ha hum, about 40 more to do now... |
Back to Projects Menu
|