|
|
|
|

|
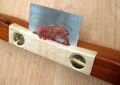
Once that's done, test it and make sure it all fits, then turn your attention to the blade. In this case I used a "proper" scraper 'cos I had a tiny one that was no actual use hand-held anyway. Alternatively cream crackered saw blades are a favoured galootish source. Such a small blade is required you could probably use a length of defunct steel rule of the wider sort too. Whatever you fancy, measure up what'll fit between the screws and mark up your blade stock. |

|
An oft-suggested method to "cut" saw blades into scraper blades is to score a line and snap it off in a vice. I've never got it to work and usually rely on Dremel or angle grinder instead. This time I clamped it firmly to the bench top with a thick piece of wood on top, the desired score line lined up with both edges, scored down the line with the tip of a file, bent it up and down and eureka; it worked! Well, almost. Always best to allow a bit of extra to file it down square and neat... Also wear some eye protection, just in case something pings where it shouldn't. |

|
Once you've got the blade sorted, you can use it to mark out the reverse of the blade clamp. Whatever you do don't chisel out an area as wide as the blade, 'cos it'll just fall through. Hence the very careful and deliberate hatching across the waste. I allowed about 5mm/3/16" either side to actually bear on the blade to hold it. Ack, you'll see what I mean in a bit. |

|
I gauged off a depth of about 3mm (1/8") and used a chisel to remove the escapement, finishing up with a fine file just to ease the passage for the shavings. Also, very carefully I removed a sliver or two either side where the blade clamp actually bears on the blade. It's not necessary, but it gives a neater appearance. Whatever you do, don't make it as deep as the blade is thick, or it won't grip! |

|
That's the last finicky bit. From here on it's just the artistic stuff shaping it. Like a fool I didn't make myself a pattern but eye-balled it instead - so it's not exactly symmetrical... As long as you leave a bit in the middle with a flat sole you can do practically what you like. I took off the worst with the bandsaw. |

|
Then some more shapely hogging with a shave before finishing with scraper and abrasives. Of course what I really needed was a scraper like this to make the scraper. The bolts are there 'cos I'd yet to find the machine screws I needed at the time, the large penny washers helping to prevent the heads dinging up the face. Made shaping a bit of a challenge though... |

|
While the shellac was drying, I ground a bevel on the blade, removed the corners and turned the burr. Experiments showed a straight edge like a card scraper just didn't have enough bite in this configuration. |

|
A coat of beeswax polish, courtesy of my chum Adam's bees, and all the parts ready to go. Best not to put wax on the areas where you want some grip, incidentally... Finally sourced the M6 slot headed countersunk machine screws in brass, for a fancy finish. |

|
Time for a trial. Pushing or pulling, whatever works best. That's the advantage of not building in an angle in the blade bedding. |
|
Whispy shavings all present and correct; s'working fine. Doesn't look too bad either, say it I shouldn't. Maybe I'll cut down the excess blade, maybe not. |

|
Above it is a Chair Devil or Spindle Scraper, for use on round section (like, er, spindles. D'oh!) Same principle, just a larger body to accommodate the curve (about 29mm (1 1/8") square), the curve in the sole and blade of course, and turned handles. The curve in the sole looks complicated, but simply done with a forstner bit once the blade clamp is fitted. A drum sander makes quick work of the blade too. Don't make the curve a perfect semicircle though, or the corners are apt to ding the work. |
Previous Page Projects Menu
|