Am I an expert in making and replacing hammer handles? Not likely. This is only the second one I've done. But on the other hand there seems to be very little out there on the subject, bar a tutorial that now seems to have gone awol. But that was using a ready-made handle anyway. Fie and forsooth! Of course you could argue that it's not exactly difficult to fashion a workable hammer handle without step-by-step instruction, and you'd be right, but on the other hand if this should give one person the necessary confidence to give it a go themselves then my work here is not in vain.
|

|
The raw materials. In this case one London Pattern Shoemaker's Hammer head; one small metal wedge that came with the head's original, loose handle; one wooden wedge; one piece of reasonably straight-grained Ash. Ash and Hickory are the number one choices for hammer handles and who am I to argue? The required size varies; this one's about 9 1/2" long, 1 1/4" wide and 7/8" thick, but it's unusual in being shorter and sturdier than the normal run of hammer types. If in doubt, simply get a rough idea from measuring an existing handle, in a shop if necessary... |

|
For some reason it seemed a good idea to bandsaw out the "waist" shape in the handle, but to be honest I think it might have been easier to just make the tapering oval shape and then worked in the waist afterwards. It's the usual method of shaving the corners first, in this case aiming for a oval shape rather than a circle. Pencil in some guidelines if you like. I used a spokeshave set very rank, but you could use a drawkife, plane, rasp, whatever you fancy. |

|
So here are the first four big corners removed, leaving a squashed octagon and already a more comfortable handle to hold. |

|
At the other end I penciled round the inside of the hammer head eye to give myself an idea of what size the handle needed to taper down to. |

|
Here's the very rough outline of the finished shape. Not a thing of beauty, but don't panic - yet. |

|
The next step is to take those corners off, and then the corners that generates have to be removed, and so forth until you're forming a nice rounded surface. Unhelpfully, it's really simply a case of removing the wood that isn't the finished handle. If it's any comfort the second one was a lot easier than the first, so don't despair if your first attempt ain't so good. I left the final stages until after the hurly burly of fitting the head. |

|
I double checked the position of the hammer head in relation to my newly formed handle and redrew the eye in the right place again - the cross was just there to help centre the head on the handle end. It's worth marking the orientation of the head on the handle so you can put it back the right way for each test fit, especially with older, uneven heads. Then I shaved down the very end just to the pencil line and tried it for fit. |

|
You can see where the dirt in the head marks the wood where it needs to be removed. Quite early on I switched to a file and removed just a fraction at a time - sooner a good tight fit achieved slowly than a loose fit and having to start again. |

|
Once the head started to slip firmly enough onto the handle that I didn't need to hold it I took to holding the handle upright on the bench and tapping it down hard. That way the head naturally seats itself and you can see if it's going on straight. It's very easy to make the head a nice fit but at an unusable angle, so check that often. Making steady progress here. |

|
After some more filing and checking and filing and checking it's fitting snugly and the over enthusiastic wood removal at the very end is well clear and ready to be removed in the fullness of time. |

|
A quick scrape and sand to put the final touches to the handle... |

|
A coat of finishing oil to keep it looking clean - more to follow over the next few days and weeks but the first coat will at least keep out the worst of the dirt. |

|
And the moment of truth. The head's seated firmly on the shaft, the heel of the handle is firmly on the bench and the wooden wedge is being pounded in. |

|
Then trimmed flush. This is an awkward type of eye on this head; it flares an awful lot at the top, more than the handle and wedges will be able to fill. |

|
And as I feared, with no support to the top of the handle from the eye the hammering home of the metal wedge has caused a bit of a mess. It doesn't look pretty but it's as solid as a rock. |

|
This is how it should look, with the more common shape of eye, all filed flush. |
|
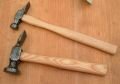
The finished product, ready for more years of useful toil. The Exeter Pattern cross pein above was the first handle I made. See what I mean about first attempts? It works though, even if it is pretty ugly. |