|

|
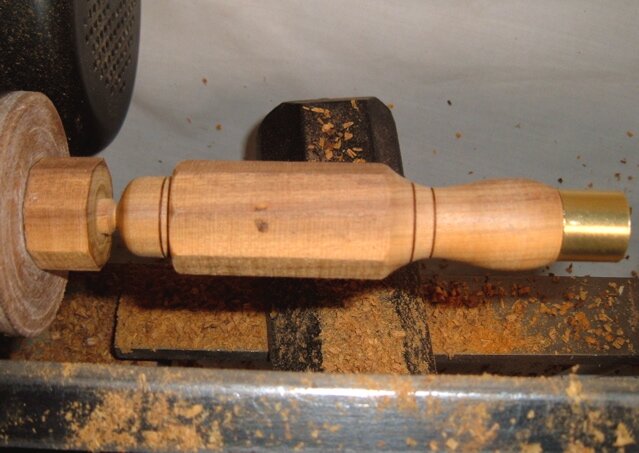
So here 'tis mounted on the screwchuck with the live centre in the tail stock to keep it well behaved. Oh, and we're in the dark in t'other place now, so my photography skills take a hopeless plummet. Good light makes David Baileys of us all... |

|
First thing I do is fit the ferrule - measuring inside diameter of same. Here in the UK Craft Supplies ferrules are pretty good and available in a smaller size to the Axminster ones. The latter vary in height/length between sizes to an irritating degree, at least to me. |

|
I use a parting tool to make a shoulder of the right size, but narrow in case I go too far - I'll still have enough blank length to make the handle. About one in four ferrules is either too loose or too tight a fit 'cos I'm hopeless. |

|
Once the diameter is correct, it's taken down the blank far enough to accommodate the ferrule and the latter is fitted on, often with a little friction to heat it up to expand a little and a mallet. On the other hand epoxy can hide a multitude of sins of the other variety too... |

|
Now with my reference point of the ferrule set I can mark up the important features of the handle in pencil on the blank. Overall length, the shoulder transition from knob-on-the-end to flats, where the flat sweeps down, and sometimes the narrowest point too. |

|
The length and knob-on-the-end parts are obvious, but the band at the narrowest point I turn to roundabout the size of the knob-on-the-end simply as a visual reference - partially for diameter and partially for the location of the narrowest part. Works for me. The parting tool's still doing all the work. |

|
Here I've used a spindle gouge to make a hash of the transition down to the ferrule and the roughing gouge for the sweep down from the flat area towards the narrowest bit. |

|
Spindle gouge again to start the curve on the knob-on-the-end and rouging gouge to do the sweeping shape at the front (apart from the bit right by the ferrule where it won't go). I can wreak untold disaster with a spindle gouge, but the roughing gouge and parting tool I rather like. No scrapers of abrasives used; I prefer to sand with the grain off the lathe. You might notice the flat at the bottom isn't quite symmetrical with the top? Fear not, that's why I leave the final finishing of the octagonal section until after the turning, to allow for any little problems like that. |

|
This is a fun bit, making the decorative dark lines. I think you're supposed to use a sort of cheese wire, but I just reverse the blade in a junior hacksaw frame i.e. teeth in, and use that. Friction is what you want; just for once burning smells are a Good Thing. |

|
Getting technical now. This bootiful piece of artwork (prints available from the gallery shop) is s'posed to illustrate that you take the diagonal measurement of the tang at a few points (at least three) to work out what size drill bits you need, and how deep you need to drill them. |

|
If you have a few to do it's worth making a note of bits and how deep on each blade to avoid mistakes. |

|
An example of drill bits taped up to the required depths. Always start with the largest of course, but you knew that. One of these days I need to try one of those smaller Miller Dowel bits and do it all in one go. |

|
Drill chuck in the tailstock, advance same and... well it's all just boring. |

|
Okay, all done, knob-on-the-end almost fully formed and ready to go back to the bench. |